Food Sticking to Stainless Steel? How to Stop It

Updated: Aug 10

Why Is Food Sticking to Stainless Steel?
How we research recommendations: The products discussed here have not been personally tested by Amour Living unless clearly stated. We compared current product specifications, dimensions, materials, customer ratings and recurring feedback. Availability, ratings and product details can change, so recheck the listing and measure your cabinet before ordering.
Affiliate disclosure: This article may contain affiliate links. If you make a qualifying purchase through one of these links, Amour Living may earn a commission at no additional cost to you.
Food sticking to stainless steel usually happens when the pan is too cool, overheated, the food is wet, or you try to move it before a browned surface has formed and released naturally.
The practical fix is simple: preheat the dry pan over moderate heat, add a thin layer of oil or butter, add dry food when the fat is ready, and leave proteins alone until they release with gentle pressure. That method matters more than buying a more expensive pan.
Why stainless steel sticks
Stainless steel does not have a permanent nonstick coating. Food—especially protein-rich food such as eggs, fish, chicken, and meat—can grip the cooking surface as it heats. Correct preheating and fat help create separation, while browning eventually weakens that grip. This is why a piece of chicken that seems stuck after one minute can lift cleanly a little later.
Some brown residue is not a failure. The browned layer left after searing is called fond, and it can be dissolved with water, stock, or wine to build a pan sauce. The problem is black, bitter burning or food that tears because it was forced too early.
The repeatable method
1. Start with a clean, dry pan
Old burnt residue creates rough, uneven contact points and can scorch before the new food cooks. Wash and dry the pan fully before heating it. Choose a burner close to the diameter of the pan so one small area is not taking all the heat.
2. Preheat over moderate heat
Place the empty stainless steel pan over medium-low to medium heat. Give the metal time to heat evenly. A heavy, fully clad pan may respond differently from a thin disc-bottom pan, so treat any fixed number of minutes as a starting point rather than a rule.
All-Clad’s official care guidance recommends low to moderate preheating and adding food when the oil is hot.
3. Use the water-drop test as a clue, not a command
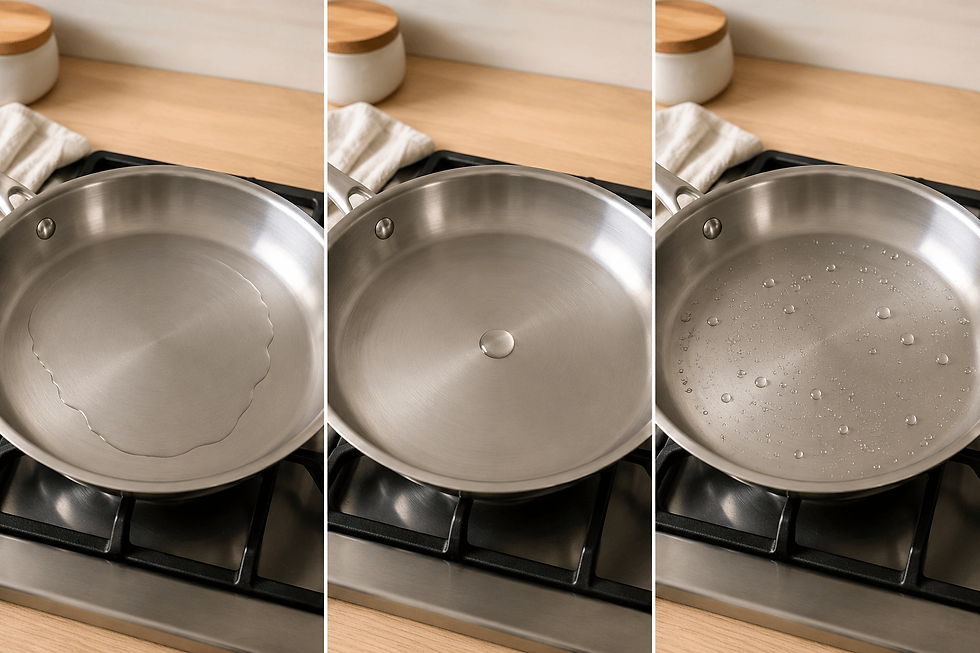
A few drops of water can help you learn your pan. If they sit and slowly evaporate, the pan is still cool. If a small bead forms and glides, the surface is hot enough for many searing jobs. If the water bursts into many frantic droplets or vanishes immediately, the pan may be too hot.
Wipe away the test water before adding fat. Do not chase an aggressively dancing bead for eggs, butter, or delicate foods; those often need gentler heat. Made In demonstrates the water test as a preheating cue, but the food you are cooking still determines the final setting.
4. Add fat after the pan is warm
Add enough oil to form a thin, continuous film across the cooking area. Let it loosen and shimmer, then add the food. If the oil smokes strongly, pull the pan off the heat, let it cool, wipe it safely, and restart lower. Butter can burn quickly, so use gentler heat or combine it with a suitable cooking oil when the recipe allows.
5. Dry the food
Pat meat, poultry, fish, and watery vegetables dry with clean paper towel before seasoning and cooking. Surface water cools the pan, encourages steaming, and increases splatter. It also makes browning slower, which keeps the food in its sticky stage for longer.
6. Leave room between pieces
Crowding releases more moisture than the pan can evaporate. The temperature drops, the food steams, and several pieces can stick at once. Cook in batches if necessary, especially when the food has just come from the refrigerator.
7. Wait for natural release

Place the food down and stop nudging it. When a browned crust has formed, many proteins loosen naturally. Test one edge with a thin spatula. If it resists, give it more time rather than scraping harder. All-Clad’s guidance similarly notes that food on stainless steel is ready to turn when it no longer sticks.
How to adjust the method for different foods
Eggs need gentler heat and more attention

Eggs are less forgiving than a chicken breast or steak. Preheat gently, lower the burner if necessary, coat the whole cooking area with butter or oil, and add the egg before the fat burns. For scrambled eggs, keep the heat moderate to low and move the curds with a flexible spatula. Even with good technique, stainless steel may not be as effortless as a sound nonstick pan for eggs. That is a tool-choice limitation, not a personal failure.
Fish needs a dry surface and patience
Pat fish very dry. Add it presentation-side or skin-side down and press only briefly if it curls. Leave it until the browned surface releases. Very delicate, skinless fillets can still be easier in another pan, and the article should not pretend stainless steel is ideal for every fish.
Chicken and meat need space
Dry the surface, preheat adequately, add a thin film of oil, and avoid crowding. When checking doneness, use temperature rather than color or how easily the food releases.
USDA advises using a food thermometer and lists safe minimum internal temperatures for meat, poultry, fish, and egg dishes.
For readers who do not already own one, the ThermoPro TP19H instant-read food thermometer is an optional, practical way to check the center of food. It is for food temperature—not for measuring the pan surface. The manufacturer lists an auto-rotating display, temperature lock, calibration, and an IP65-rated body.
Troubleshooting: what your pan is telling you
The food sticks immediately and stays pale
The pan or the fat was probably not warm enough, or too much cold food was added at once. Next time, preheat a little longer and cook a smaller batch.
The oil smokes before the food goes in
The pan is too hot for that fat. Remove it from the burner and restart lower. Do not add wet food to smoking oil.
The outside burns before the inside cooks
The burner is too high, the food is too thick for a hard sear alone, or the pan has a concentrated hot spot. Lower the heat after browning and finish more gently, following a suitable recipe and checking safe internal temperature.
The food tears when you turn it
It was likely moved too soon, the surface was wet, or the tool was too thick to slide underneath. Wait, then test a small edge. A thin turner can help, but technique comes first.
Everything sticks even when the water beads

The water test only tells you something about the empty pan at that moment. Cold or wet food can pull the temperature down, too little fat can leave bare steel, and excessive heat can burn the oil. Check the entire sequence rather than relying on one trick.
How to clean stuck food without damaging the pan

Let the pan cool enough to handle safely, but do not leave the residue to harden overnight if you can avoid it. Add warm water and dish soap, soak briefly, and loosen residue with a non-scratch sponge or wooden utensil. For savory browned residue that is not burnt, deglazing the warm pan with liquid can lift it while creating the base of a sauce.
For stubborn baked-on residue or discoloration on uncoated stainless steel, Bar Keepers Friend Cookware Cleanser & Polish is an optional rescue product rather than an everyday requirement. The manufacturer says to use it on a damp surface, work with a soft cloth or sponge, rinse promptly, and avoid nonstick coatings. Follow the package directions and your cookware maker’s care instructions.
Do you need to season a stainless steel pan?
Not for normal use. A temporary oil layer can make the surface feel slicker, but stainless steel is designed to be cleaned and used without maintaining a permanent seasoning layer. Proper heat, fat, moisture control, and timing are more repeatable—and they do not leave readers wondering whether ordinary washing has ruined the pan.
When a different pan is the honest answer
Stainless steel is excellent for browning, searing, sautéing, and making pan sauces. It is not automatically the easiest tool for eggs, very delicate fish, pancakes, or low-fat cooking. A reliable nonstick or well-seasoned carbon-steel pan may be more practical for those jobs.
That does not replace stainless steel; it gives each pan a sensible role.
The Amour Living reset
On your next attempt, change one variable at a time. Start at a moderate burner setting. Preheat the dry pan. Add a thin film of fat. Dry the food. Cook fewer pieces. Then wait. This slower, calmer sequence fixes more sticking problems than buying another pan or turning the heat to maximum.
If awkward storage is making cookware harder to use, see our guide to organizing deep kitchen drawers without wasting space. For food and cooking supplies, our small pantry organization guide shows how to improve access without buying a complete matching container set.
Frequently Asked Questions
Why does food stick to my stainless steel pan even after preheating?
Preheating is only one part of the method. Wet or cold food, too little fat, crowding, excessive heat, and trying to turn protein too early can all cause sticking.
Should the pan be hot before I add oil?
For ordinary stainless steel cooking, manufacturer guidance commonly recommends warming the dry pan first, then adding oil and allowing it to heat before the food goes in. Use moderate heat and stop if the oil smokes strongly.
Does the water-drop test make stainless steel nonstick?
No. It is a preheating cue. You still need the right heat for the food, enough fat, a dry surface, room in the pan, and correct timing.
Why do eggs still stick?
Eggs are especially prone to sticking and usually need gentler heat, complete fat coverage, and a suitable spatula. Stainless steel may still require more skill than nonstick for eggs.
Can I use cooking spray?
Check your cookware maker’s instructions. Many sprays can leave a stubborn film. A small amount of ordinary cooking oil or butter is easier to distribute and monitor.
How do I know meat is safely cooked?
Use an instant-read food thermometer in the thickest part and follow USDA safe minimum internal-temperature guidance. Pan release, color, and cooking time are not reliable safety tests.


Comments